Installing Visual Studio (Windows)


Introduction

This guide walks you through installing Visual Studio on Windows with everything you need to build native C++ applications using DirectX, OpenGL, and Vulkan.

We will use the free Community edition, but the steps are identical for Professional or Enterprise.


System Requirements

ComponentMinimum Requirement
OSWindows 10 version 1809+ or Windows 11
Processor1.8 GHz or faster (quad-core recommended)
RAM4 GB (8 GB+ recommended for large shader compiles)
Disk space~20 GB (C++ toolchain + graphics SDKs)
GraphicsDirectX 11/12 capable GPU (for running samples)

⚠️ Graphics programming requires a GPU that supports the API version you are targeting.


Download the Visual Studio Bootstrapper

Installing Visual Studio is easy, Microsoft provide you with the bootstrapper/installer which pretty much does everything for you automatically. To install the boostrapper:

  1. Visit the official download page:
  2. Under the Community section, click Free download.
  3. Save the bootstrapper file (e.g., vs_Community.exe) to your computer.

Run the Installer and Select the Correct Workload

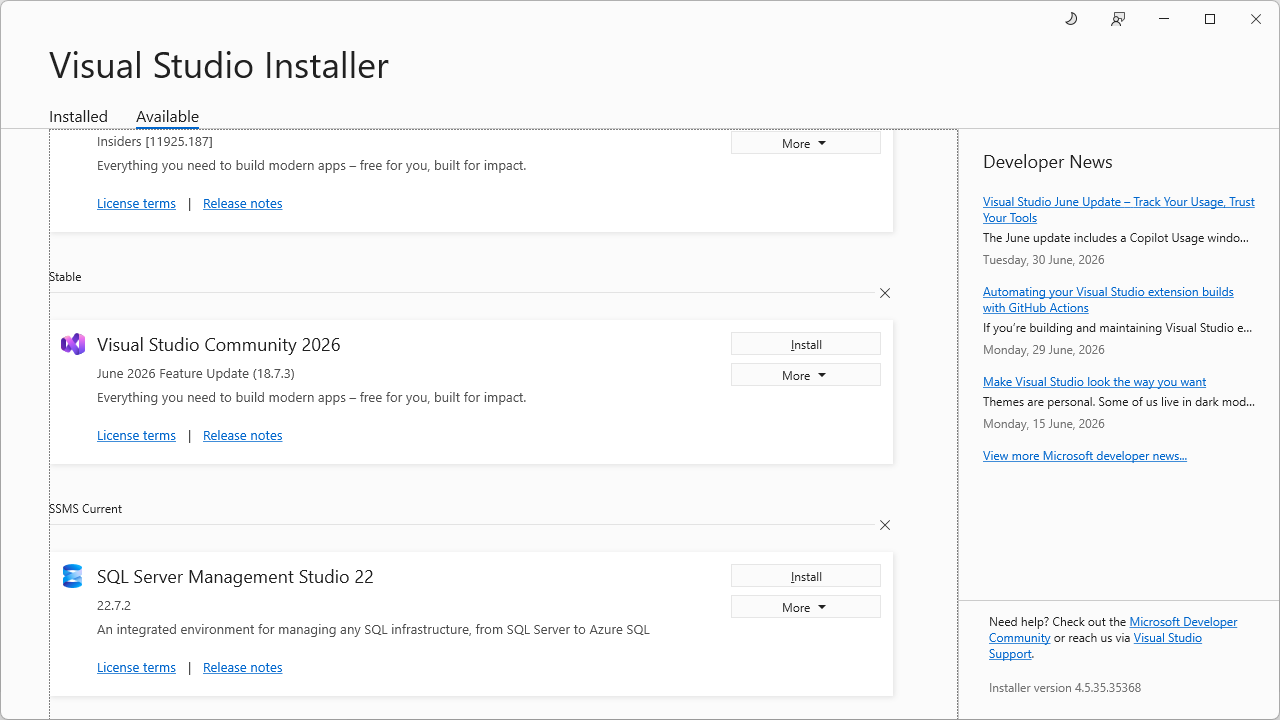
Double-click the bootstrapper. When the Visual Studio Installer opens, choose this workload:

WorkloadWhat it gives you
Desktop development with C++The MSVC compiler, C++ standard library, CMake integration, and the core Windows SDK.

Do not select any other workloads (like .NET, Python, or Unity) – they are not needed for Kemena3D.

Optional Individual Components (pre-selected by default, but verify):

Click the Individual components tab and ensure these are checked:

  • MSVC v143 - VS 2022 C++ x64/x86 build tools (latest compiler)
  • Windows 10/11 SDK (contains DirectX headers, libraries, and d3dcompiler_47.dll)
  • C++ CMake tools for Windows (if you prefer CMake over classic .sln projects)
  • Windows Universal C Runtime (always included)

You do not need:

  • C++/CLI support
  • C++ modules
  • Any Linux/Embedded/IoT tools

Graphics API Specific Notes (Read Before Installing)

DirectX

  • The Windows SDK (selected above) includes all DirectX headers (d3d11.h, d3d12.h, dxgi.h, etc.) and libraries.
  • For legacy DirectX 9/10, you may need the older June 2010 DirectX SDK – but this is rarely needed for modern development. Stick with the Windows SDK.

OpenGL

  • OpenGL headers and libraries (gl.h, opengl32.lib) are already part of Windows. Visual Studio finds them automatically.
  • However, most modern OpenGL applications use GLFW (for window creation) and GLAD / GLEW (for loading extensions). These are not installed by Visual Studio – you will add them later via vcpkg, CMake, or manual download.

Vulkan

  • Vulkan is not included with Visual Studio or the Windows SDK.
  • You must download the official Vulkan SDK separately from LunarG:
  • The Vulkan SDK includes:
    • Vulkan headers and loader (vulkan.h, vulkan-1.dll)
    • Validation layers
    • Shader compiler (glslangValidator.exe / dxc.exe)
    • Debugging tools (like Vulkan Configurator)

🛠️ Install the Vulkan SDK after Visual Studio – its installer will automatically detect your MSVC compiler and integrate with it.


Start the Installation

After you have confirmed what you want to install, you may start the installation process:

  1. Click the Install button at the bottom right.
  2. The download and installation will begin. This takes 20 – 40 minutes depending on your internet speed.
  3. Once finished, you will see a Launch button.

Modifying or Updating Your Installation

If you ever need to add missing components (e.g., a different MSVC version, the C++ profiling tools, or an updated Windows SDK):

  1. Download the SDK from LunarG.
  2. Run the installer – it will ask for the installation path and offer to integrate with Visual Studio.
  3. After installation, create a new C++ project and test:

Installing Vulkan SDK (optional)

To update Visual Studio to a newer minor version (e.g., 17.10 → 17.11), click Update in the installer instead of Modify.

  1. Open the Visual Studio Installer from the Start Menu.
  2. Find your installed version and click Modify.
  3. In the Workloads tab, ensure Desktop development with C++ is still checked.
  4. Switch to the Individual components tab to add or remove specific tools:
    • Add a newer Windows SDK version if needed.
    • Add the C++ AddressSanitizer for memory debugging.
    • Add the vcpkg package manager to easily install graphics libraries (GLFW, Vulkan‑headers, etc.).
  5. Click Modify at the bottom right to apply changes.

Happy building Kemena3D!


Installing Visual Studio (Windows)


Introduction

This guide walks you through installing Visual Studio on Windows with everything you need to build native C++ applications using DirectX, OpenGL, and Vulkan.

We will use the free Community edition, but the steps are identical for Professional or Enterprise.


System Requirements

ComponentMinimum Requirement
OSWindows 10 version 1809+ or Windows 11
Processor1.8 GHz or faster (quad-core recommended)
RAM4 GB (8 GB+ recommended for large shader compiles)
Disk space~20 GB (C++ toolchain + graphics SDKs)
GraphicsDirectX 11/12 capable GPU (for running samples)

⚠️ Graphics programming requires a GPU that supports the API version you are targeting.


Download the Visual Studio Bootstrapper

Installing Visual Studio is easy, Microsoft provide you with the bootstrapper/installer which pretty much does everything for you automatically. To install the boostrapper:

  1. Visit the official download page:
  2. Under the Community section, click Free download.
  3. Save the bootstrapper file (e.g., vs_Community.exe) to your computer.

Run the Installer and Select the Correct Workload

Double-click the bootstrapper. When the Visual Studio Installer opens, choose this workload:

WorkloadWhat it gives you
Desktop development with C++The MSVC compiler, C++ standard library, CMake integration, and the core Windows SDK.

Do not select any other workloads (like .NET, Python, or Unity) – they are not needed for Kemena3D.

Optional Individual Components (pre-selected by default, but verify):

Click the Individual components tab and ensure these are checked:

  • MSVC v143 - VS 2022 C++ x64/x86 build tools (latest compiler)
  • Windows 10/11 SDK (contains DirectX headers, libraries, and d3dcompiler_47.dll)
  • C++ CMake tools for Windows (if you prefer CMake over classic .sln projects)
  • Windows Universal C Runtime (always included)

You do not need:

  • C++/CLI support
  • C++ modules
  • Any Linux/Embedded/IoT tools

Graphics API Specific Notes (Read Before Installing)

DirectX

  • The Windows SDK (selected above) includes all DirectX headers (d3d11.h, d3d12.h, dxgi.h, etc.) and libraries.
  • For legacy DirectX 9/10, you may need the older June 2010 DirectX SDK – but this is rarely needed for modern development. Stick with the Windows SDK.

OpenGL

  • OpenGL headers and libraries (gl.h, opengl32.lib) are already part of Windows. Visual Studio finds them automatically.
  • However, most modern OpenGL applications use GLFW (for window creation) and GLAD / GLEW (for loading extensions). These are not installed by Visual Studio – you will add them later via vcpkg, CMake, or manual download.

Vulkan

  • Vulkan is not included with Visual Studio or the Windows SDK.
  • You must download the official Vulkan SDK separately from LunarG:
  • The Vulkan SDK includes:
    • Vulkan headers and loader (vulkan.h, vulkan-1.dll)
    • Validation layers
    • Shader compiler (glslangValidator.exe / dxc.exe)
    • Debugging tools (like Vulkan Configurator)

🛠️ Install the Vulkan SDK after Visual Studio – its installer will automatically detect your MSVC compiler and integrate with it.


Start the Installation

After you have confirmed what you want to install, you may start the installation process:

  1. Click the Install button at the bottom right.
  2. The download and installation will begin. This takes 20 – 40 minutes depending on your internet speed.
  3. Once finished, you will see a Launch button.

Modifying or Updating Your Installation

If you ever need to add missing components (e.g., a different MSVC version, the C++ profiling tools, or an updated Windows SDK):

  1. Download the SDK from LunarG.
  2. Run the installer – it will ask for the installation path and offer to integrate with Visual Studio.
  3. After installation, create a new C++ project and test:

Installing Vulkan SDK (optional)

To update Visual Studio to a newer minor version (e.g., 17.10 → 17.11), click Update in the installer instead of Modify.

  1. Open the Visual Studio Installer from the Start Menu.
  2. Find your installed version and click Modify.
  3. In the Workloads tab, ensure Desktop development with C++ is still checked.
  4. Switch to the Individual components tab to add or remove specific tools:
    • Add a newer Windows SDK version if needed.
    • Add the C++ AddressSanitizer for memory debugging.
    • Add the vcpkg package manager to easily install graphics libraries (GLFW, Vulkan‑headers, etc.).
  5. Click Modify at the bottom right to apply changes.

Happy building Kemena3D!


Installing Visual Studio (Windows)


Introduction

This guide walks you through installing Visual Studio on Windows with everything you need to build native C++ applications using DirectX, OpenGL, and Vulkan.

We will use the free Community edition, but the steps are identical for Professional or Enterprise.


System Requirements

ComponentMinimum Requirement
OSWindows 10 version 1809+ or Windows 11
Processor1.8 GHz or faster (quad-core recommended)
RAM4 GB (8 GB+ recommended for large shader compiles)
Disk space~20 GB (C++ toolchain + graphics SDKs)
GraphicsDirectX 11/12 capable GPU (for running samples)

⚠️ Graphics programming requires a GPU that supports the API version you are targeting.


Download the Visual Studio Bootstrapper

Installing Visual Studio is easy, Microsoft provide you with the bootstrapper/installer which pretty much does everything for you automatically. To install the boostrapper:

  1. Visit the official download page:
  2. Under the Community section, click Free download.
  3. Save the bootstrapper file (e.g., vs_Community.exe) to your computer.

Run the Installer and Select the Correct Workload

Double-click the bootstrapper. When the Visual Studio Installer opens, choose this workload:

WorkloadWhat it gives you
Desktop development with C++The MSVC compiler, C++ standard library, CMake integration, and the core Windows SDK.

Do not select any other workloads (like .NET, Python, or Unity) – they are not needed for Kemena3D.

Optional Individual Components (pre-selected by default, but verify):

Click the Individual components tab and ensure these are checked:

  • MSVC v143 - VS 2022 C++ x64/x86 build tools (latest compiler)
  • Windows 10/11 SDK (contains DirectX headers, libraries, and d3dcompiler_47.dll)
  • C++ CMake tools for Windows (if you prefer CMake over classic .sln projects)
  • Windows Universal C Runtime (always included)

You do not need:

  • C++/CLI support
  • C++ modules
  • Any Linux/Embedded/IoT tools

Graphics API Specific Notes (Read Before Installing)

DirectX

  • The Windows SDK (selected above) includes all DirectX headers (d3d11.h, d3d12.h, dxgi.h, etc.) and libraries.
  • For legacy DirectX 9/10, you may need the older June 2010 DirectX SDK – but this is rarely needed for modern development. Stick with the Windows SDK.

OpenGL

  • OpenGL headers and libraries (gl.h, opengl32.lib) are already part of Windows. Visual Studio finds them automatically.
  • However, most modern OpenGL applications use GLFW (for window creation) and GLAD / GLEW (for loading extensions). These are not installed by Visual Studio – you will add them later via vcpkg, CMake, or manual download.

Vulkan

  • Vulkan is not included with Visual Studio or the Windows SDK.
  • You must download the official Vulkan SDK separately from LunarG:
  • The Vulkan SDK includes:
    • Vulkan headers and loader (vulkan.h, vulkan-1.dll)
    • Validation layers
    • Shader compiler (glslangValidator.exe / dxc.exe)
    • Debugging tools (like Vulkan Configurator)

🛠️ Install the Vulkan SDK after Visual Studio – its installer will automatically detect your MSVC compiler and integrate with it.


Start the Installation

After you have confirmed what you want to install, you may start the installation process:

  1. Click the Install button at the bottom right.
  2. The download and installation will begin. This takes 20 – 40 minutes depending on your internet speed.
  3. Once finished, you will see a Launch button.

Modifying or Updating Your Installation

If you ever need to add missing components (e.g., a different MSVC version, the C++ profiling tools, or an updated Windows SDK):

  1. Download the SDK from LunarG.
  2. Run the installer – it will ask for the installation path and offer to integrate with Visual Studio.
  3. After installation, create a new C++ project and test:

Installing Vulkan SDK (optional)

To update Visual Studio to a newer minor version (e.g., 17.10 → 17.11), click Update in the installer instead of Modify.

  1. Open the Visual Studio Installer from the Start Menu.
  2. Find your installed version and click Modify.
  3. In the Workloads tab, ensure Desktop development with C++ is still checked.
  4. Switch to the Individual components tab to add or remove specific tools:
    • Add a newer Windows SDK version if needed.
    • Add the C++ AddressSanitizer for memory debugging.
    • Add the vcpkg package manager to easily install graphics libraries (GLFW, Vulkan‑headers, etc.).
  5. Click Modify at the bottom right to apply changes.

Happy building Kemena3D!